Yoga for Pelvic Muscles: Strenghten & Tone
Yoga for pelvic muscles is one of the most scientific, gentle, and efficient methods of core stabilization and strengthening pelvic floor muscles, as well as helping with controlling the bladder and relieve chronic back and hip stiffness. Pelvic muscles are considered to be a hammock for supporting inner organs such as the bladder, intestines, and uterus or prostate. Weak or over-tonic pelvic muscles can be caused by various activities that you do throughout your lifetime, such as sitting too much, having children, growing older, and being under lots of stress.
Key Takeaways
- Enhanced Core & Bladder Control: Daily practice strengthens the pelvic floor structure, preventing organ prolapse and supporting healthy urinary function.
- Release of Deep Hip Tension: Targeted stretches relieve chronic tight hips and lower back stiffness caused by modern sedentary lifestyle habits.
- Improved Circulation & Vitality: Controlled pelvic movements boost blood flow to the reproductive and pelvic organs, aiding recovery and physical vitality.
Benefits of Yoga for Pelvic Muscles
Both men and women benefit from yoga for pelvic muscles to release held tension and improve pelvic floor responsiveness.
- Correcting Imbalanced Pelvis Posture: Proper alignment of the hip and pelvic region muscles will help fix pelvic tilting, whether it is anterior or posterior.
- Stability in Core and Lower Back: Functionality in the pelvic area works together with the deep core muscles to create stability for the lumbar spine.
- Treatment of Dysfunctional Pelvis: Stretching and contracting conscious exercises assist in treating muscles that may be too weak (hypotonic muscles) or too tight (hypertonic muscles).
- Reducing Stress and Stimulating Nervous System: Breathing and pelvic opening exercise will release any emotional and physical tension that is held in the hips.
Best Poses: Yoga for Pelvic Muscles
Below is a table highlighting five effective yoga postures designed to tone, stretch, and balance the pelvic muscles:
|
|
|
|
|
|
|
|
|
|
|
|
|
|
|
|
|
|
|
|
|
|
|
|
|
|
|
|
|
|
|
|
|
|
|
Step-by-Step Instructions
Incorporating simple poses of yoga for pelvic muscles can relieve chronic lower back pain and balance hip mobility.
1. Setu Bandhasana (Bridge Pose)
- Step 1: Lay down on your back on a yoga mat, keeping your knees bent and feet planted on the ground shoulder-width apart.
- Step 2: Push your feet against the ground as you inhale and lift your pelvis off the floor while contracting your pelvic muscles and glutes.
- Step 3: Cross your hands under your body to support your back and keep your shoulders away from each other.
- Step 4: Maintain the pose by breathing deeply into your lungs, slowly rolling your spine to the ground, vertebrae by vertebrae.
2. Malasana (Garland Pose)
- Step 1: Start by standing straight with feet slightly wider than hip-width distance and toes pointing outwards.
- Step 2: Breathe out as you squat down deeply, making sure that your chest remains open and back is straight.
- Step 3: Press palms of both hands together while bringing them to your chest in a prayer position and gently press your elbows into your knees.
- Step 4: Try to breathe deeply into your abdomen to loosen and stretch pelvic floor muscles before slowly rising.
3. Baddha Konasana (Butterfly Pose)
- Step 1: Assume an upright sitting position on the mat with your legs straight out in front of you.
- Step 2: Bring your legs into a bending position and place the soles of your feet together while pulling your heels closer to your hip.
- Step 3: Take hold of your feet or ankles with both hands while elongating your spine upwards on inhalation.
- Step 4: On exhalation, release your knees slowly towards the ground with rhythmical breathing.
4. Ananda Balasana (Happy Baby Pose)
- Step 1: Lay down on your back and pull your knees up towards your chest.
- Step 2: Extend your arms upwards and catch hold of your feet/ankles from both sides.
- Step 3: Spread your knees apart more than your torso with your legs bent at the knee, bringing your knees down towards your armpits and making sure that your legs are at right angles to the ground.
- Step 4: Point your toes, inhale deeply into your stomach area and sway from side to side.
5. Viparita Karani (Legs-Up-The-Wall Pose)
- Step 1: Place yourself on your side next to a wall, and slowly raise your legs up the wall as you lower your body to the ground.
- Step 2: Position yourself in such a way that your sit bones are as close as possible to the wall while supporting your back fully.
- Step 3: Stretch your arms to either side of your body, keeping your palms face-up while relaxing your shoulder and hip muscles.
- Step 4: Breathe deeply into your abdomen to release any tension from your pelvis, and bend your knees to turn to one side.
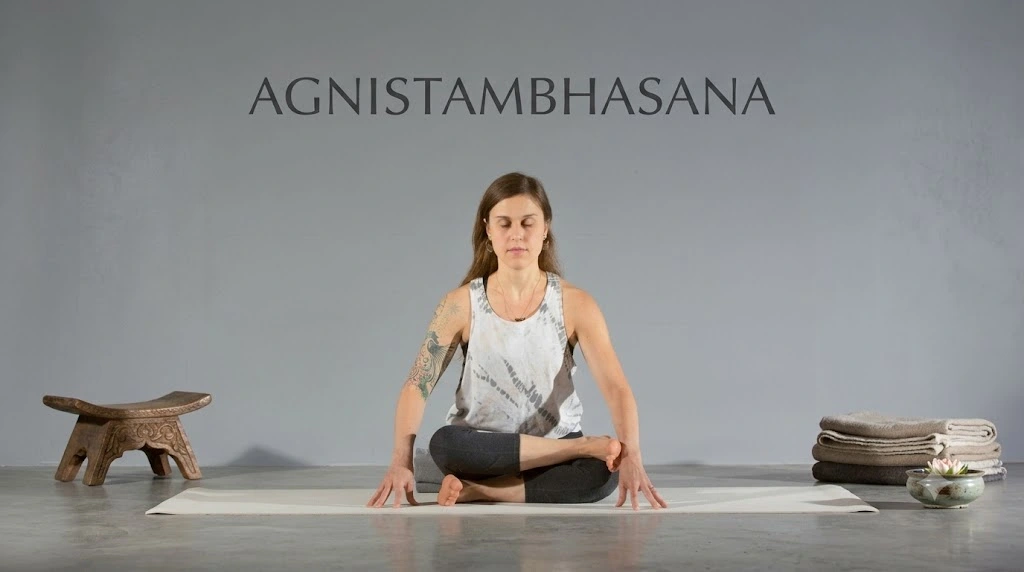
6. Agnistambhasana (Fire Log / Double Pigeon Pose)
- Step 1: Stand straight and bring your left shinbone in line with the front of your mat.
- Step 2: Place your right ankle right on top of your left knee in such a way that your shins stack like pieces of wood for fire.
- Step 3: Make sure you flex your feet tightly to keep your knees protected.
- Step 4: Stretch your back and hinge slightly from your hips.
Final Thoughts
Yoga for pelvic muscles offers a balanced, practical, and highly restorative routine for anyone looking to build core strength and release deep hip tension. By blending targeted strengthening postures with gentle, lengthening stretches, you create a resilient pelvic floor that supports your spine, improves posture, and enhances overall bodily movement.
Integrating yoga for pelvic muscles into your daily wellness routine provides a grounded path toward long-term pelvic strength, flexibility, and physical confidence.
Frequently Asked Questions (FAQs)
1. What are the best exercises for pelvic floor muscles?
The best exercises for pelvic floor health include yoga positions involving engagement and releasing such as Setu Bandhasana, Malasana, and Viparita Karani.
2. Is yoga able to strengthen weak pelvic floor muscles?
Yes, yoga positions such as Setu Bandhasana and Chair involve engaging hamstrings, glutes and deep core muscles which help in strengthening a weak pelvic floor over time.
3. Is yoga good for people with hypertonic (tight) pelvic floor muscles?
Of course! Hip opening yoga poses like Malasana and Happy Baby are all about releasing and relaxing tight pelvic muscles.
4. How much time will it take to get results from doing yoga for pelvic muscles?
If you practice daily or once per day then you can expect your core engagement to improve, your lower back to become more flexible and your bladder control to improve after 4-8 weeks.
5. Do men also need to do pelvic muscles yoga?
Yes, because pelvic yoga is helpful for lower back stability, prostate health, pelvic circulation and release of hip tightness resulting from excessive weight lifting or running.
Disclaimer: The content on LifePositive.com, including articles/blogs on yoga, acupuncture, naturopathy, and other alternative healing modalities for holistic wellness, is for informational and educational purposes only. It is not a substitute for professional medical advice, diagnosis, or treatment. Always consult a qualified healthcare provider before starting any new health protocol or making changes to an existing treatment plan.
Also read: Anjaneyasana
By Umesh Kumar Khiri


Discussion (0)
No comments yet. Be the first to comment!
Leave a Comment
You need to login to post a comment.