Yoga for Scoliosis: Poses for Alignment
The therapy of yoga for scoliosis is an excellent non-invasive treatment approach that helps to ease muscle strain, stretch tight connective tissues, and build strength of the core muscles to ensure proper alignment. Scoliosis, which is characterized by an abnormal sideways curvature of the spine, often results in muscular imbalance, high or low shoulders, tight back muscles, and constant pain. However, while yoga cannot correct the structural abnormalities in the skeleton, regular practice of certain yoga postures brings comfort and improves the condition of the spine.
Gentle breathing techniques combined with yoga for scoliosis better lung capacity on the restricted side of the chest. Focusing on breathwork, axial elongation, and muscle activation through yoga is highly beneficial for people with scoliosis.
Key Takeaways
- Spinal Decompression: Targeted lengthening poses reduce pressure on intervertebral discs and decompress tight, shortened back muscles.
- Core & Back Stabilization: Isometric postures build structural endurance on both the concave and convex sides of the spinal curve.
- Enhanced Body Awareness: Mindful alignment work helps correct subconscious posture compensations caused by uneven weight distribution.
How Yoga for Scoliosis Helps
Scoliosis causes unequal tension in the muscles. Muscles that form the concave part of the curvature become shorter and hyperactive, while the muscles in the convex part become overstretched. Yoga therapy helps through:
- Lengthening the Concave Muscles: Lengthening the muscles of the intercostals and paraspinals in the concave side of the spine.
- Toning the Convex Muscles: Toning the overstretched muscles on the convex side of the back of the body.
- Helping with Breath: Creating space in the chest cavity, allowing the lungs more room for expansion.
Yoga for Scoliosis - Key Asanas
Practising yoga for scoliosis regularly helps decompress the intervertebral discs and ease chronic muscular tension.
The following table outlines six effective poses designed to support spinal integrity, release lateral tension, and build core stability:
|
|
|
|
|
|
|
|
|
|
|
|
|
|
|
|
|
|
|
|
|
|
|
|
|
|
|
|
|
|
|
|
|
|
|
Step-by-Step Instructions
1. Tadasana (Mountain Pose)
- Step 1: Stand tall with legs shoulder-width apart, spreading equal weight on both feet.
- Step 2: Contract your thighs, engage the abdominal muscles, and lengthen the tailbone downward.
- Step 3: Roll your shoulders back and down and align your head such that your ears are over your shoulders.
- Step 4: Pull the top of the head upwards towards the ceiling and breathe deeply into the ribs from both sides.
2. Marjaryasana-Bitilasana (Cat-Cow Pose)
- Step 1: Start on hands and knees in a tabletop position.
- Step 2: Inhale into Cow Pose by bringing your belly down and tailbone up, along with broadening the collarbones.
- Step 3: Exhale into Cat Pose by pressing your palms to the floor and curving your spine upward, along with tucking the chin towards the chest.
- Step 4: Repeat between the two poses for 5-8 breaths.
3. Adho Mukha Svanasana (Downward-Facing Dog)
- Step 1: Starting from the position on all fours, curl the toes and push into the hands while raising the hips towards the ceiling.
- Step 2: Bring the chest towards the thighs while pulling the heels down towards the floor, creating an inverted "V" shape.
- Step 3: Keep the neck aligned with the upper arms and focus on stretching the spine.
- Step 4: Maintain the pose while breathing deeply, ensuring the spine is elongated.
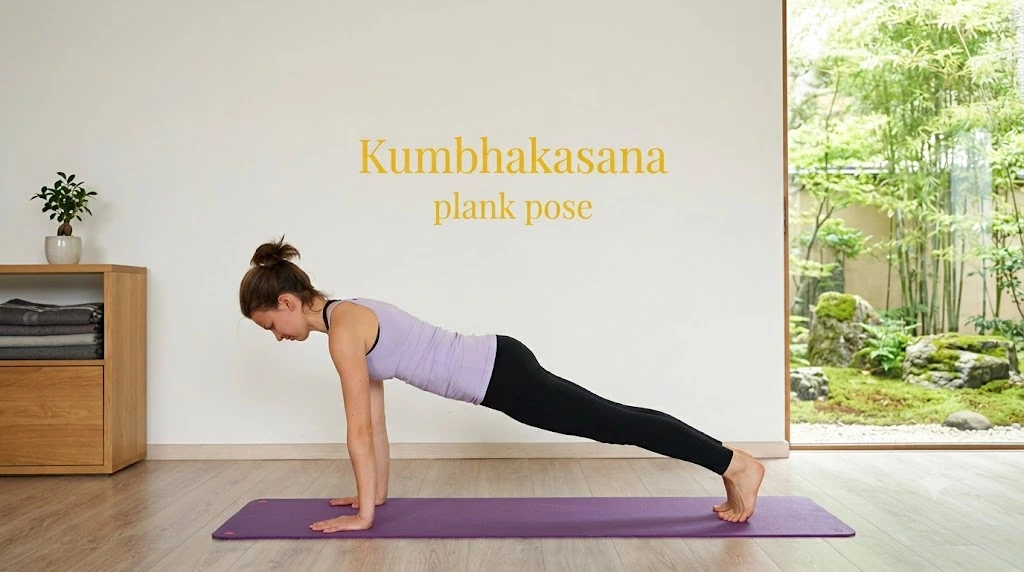
4. Kumbhakasana (Plank Pose)
- Step 1: Moving forward from the downward-facing dog pose or starting with the tabletop position and bringing the torso forward until the shoulders are directly above the wrists.
- Step 2: Place the feet back, one at a time, with the legs straight behind, standing on the balls of the feet.
- Step 3: Keep the whole body in a straight line from the head to the heels and engage the abdominal muscles and quads to prevent the sagging of the lower back or hips.
- Step 4: Widen the shoulder blades, pushing from the hands while holding the position.
5. Trikonasana (Triangle Pose)
- Step 1: Stand with your legs wide apart (approximately 3.5 to 4 feet), with your right foot turned out 90 degrees and left foot slightly inward.
- Step 2: Stretch out both arms horizontally at shoulder level, inhale, and lengthen your torso over your right leg.
- Step 3: As you exhale, bring your right hand down to touch your shin, block, or the floor while raising your left hand up.
- Step 4: Lengthen your waist on both sides, hold for 20-30 seconds, inhale, come back to upright position, and repeat on the other side.
6. Salamba Bhujangasana (Sphinx Pose)
- Step 1: Assume the lying prone position on your mat, extending legs straight back at hip-width distance apart from each other.
- Step 2: Position forearms flat on the floor, elbows under shoulders, palms on the floor facing downward.
- Step 3: Take a breath in and gradually raise your chest and head from the floor, bringing your shoulder blades down along your spine.
- Step 4: Apply mild pressure on the pubic bone into the floor and pull your lower abdominal muscles up, protecting your lower back.
Safety Tips for Scoliosis Practice
Consulting a certified practitioner ensures your routine of yoga for scoliosis is tailored specifically to your unique curve pattern.
- Listen to Pain Cues: Always heed any sharp or localized pain in the spine and immediately come out of the posture.
- Use Appropriate Props: Use props such as blocks, folded blankets, or bolsters below the hips or hands to avoid over-rotating or bending of the spine.
- Do Not Twist or Bend Too Far Backwards: Over-twisting of the spine and overbending postures such as Bow Pose or Wheel Pose may aggravate spinal issues.
- Visit a Healthcare Professional First: Always see a doctor, physical therapist, or yoga therapist knowledgeable in scoliosis first.
To Conclude
Yoga for Scoliosis offers an integrative solution for relieving pain in the back, bringing back balance in the structure and developing self-awareness of the body. You can use the asanas in the practice that will stretch the concave muscles of the back and develop core strength. It takes time and regular practice to succeed, but this kind of exercise will help to release tensions in the body while developing overall wellness.
Frequently Asked Questions (FAQs)
1. Can yoga straighten a scoliotic spine?
However, yoga will not be able to rectify the skeletal curves caused by bone deformation, but consistent practice will help to correct the functional posture, balance muscle tone around it, stop the progression of the curve, and ease the pain that occurs due to it.
2. How frequently should I do yoga for the treatment of scoliosis?
Frequent sessions, although they will be short (15-20 min every day or 3-4 times a week), will show better results in muscle training and pain elimination than occasional long sessions. Every morning, try to do yoga for scoliosis.
3. Should I do exercises symmetrical to each other?
This depends on the particular shape of the curve. Often, people practice stretches longer on the concave side of the spinal column to relieve the asymmetry of the body; however, it is better to consult a professional.
4. Is Plank Pose (Kumbhakasana) good for scoliosis?
Yes, Plank Pose is good since it strengthens the abdominal and back muscles isometrically without lateral bends and twists.
Also Read: Yoga for maternity
By Umesh Kumar Khiri

.jpg)

Discussion (0)
No comments yet. Be the first to comment!
Leave a Comment
You need to login to post a comment.